Import GUI
The import GUI is a add-on for the Pacemaker Professional Edition (PE) and Pacemaker Enterprise Edition (EE).
It enables shop owners or other people that work in the Magento backend to upload import files e.g., in CSV format, create the .ok file and start the import process.
It can be done by either the default Magento CRON, manually on the CLI with the bin/magento pacemaker:import <ID> command or by one of the Pipelines provided by the
Enterprise edition.
Configure the GUI
In case, the GUI will be used with Pacemaker Enterprise Edition (EE). The configuration can be found under the following path: and should contain the following values
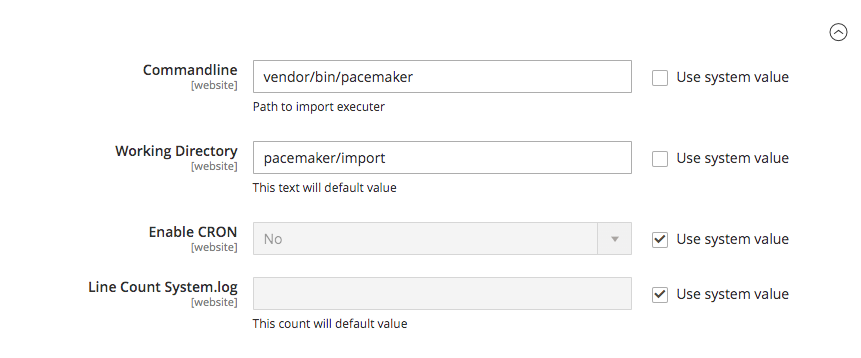
GUI settings
The configuration value for Commandline should be set to the Pacemaker CLI that has to be used to create the
.ok file that is necessary to start the import.
By default this value should be set to vendor/bin/pacemaker.
As a pipeline should be used to import the files, the configuration value for Working Directory has to be the
same as for the Pacemaker
working directory
, but without the
leading var.
The configuration for Enable CRON must not be set to Yes because this will probably use the default
Magento CRON to start the import and passing by the appropriate pipeline.
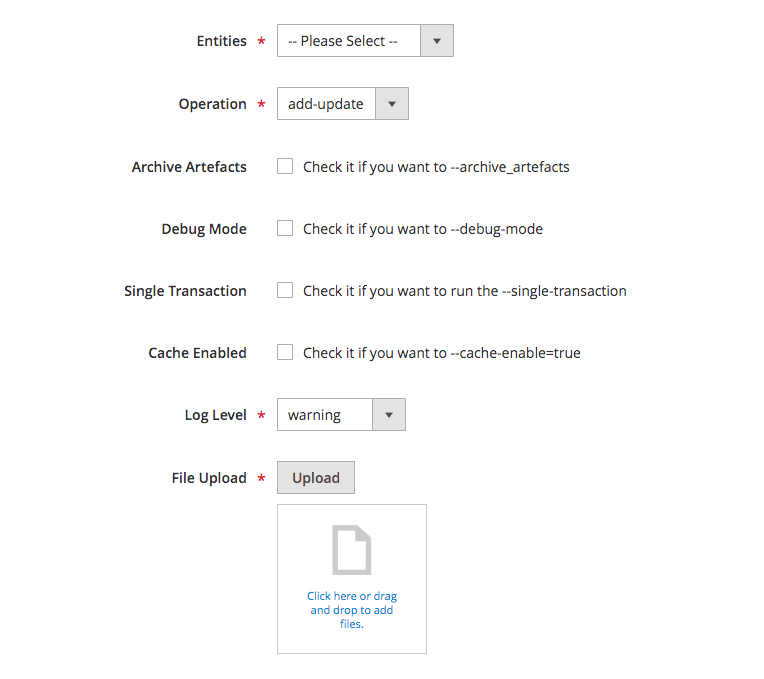
Upload files
In general, the GUI will provide the functionality to upload CSV files and adjust the settings for the
import process itself, e.g. the mode that has to be used like add-update.
Depending on the GUI configuration and the used Pacemaker edition, the uploaded files will be imported directly or via one of the pipelines.
|
Keep in mind, that in combination with Pacemaker Enterprise Edition (EE) and the configuration described above, the upload GUI can only be used to upload files. It is not possible to configure the import itself, as this will be done by the pipeline configuration that finally runs the import. Therefore, the configuration will have no impact. |
Upload GUI
Via the drop-down Entities, the entity type that matches the uploaded files has to be selected.
If the entity type doesn’t match the filename, an error will be triggered.
In case the Product entity has been chosen, the additional drop-down Import Mode will be rendered.
Import Modes
The Default import mode imports all the data that is available in the file, notwithstanding the data has
changed since the last import or not.
In contrast, The import mode Change-Set Detection will compare the data (configurable change-sets) from the database
with the one found in the import files and only updates the DB if the data has been changed.
They can improve performance massively in add-update mode, as invoking DB CRUD operations are very performance intensive.
|
The mode It should be considered well also to activate the feature-configuration/import/caching-and-cache-warming.html#cache-warming[cache warming] functionality, because this can additionally have a significant impact on performance because all the data to be compared to, will be loaded during the bootstrap process in a very efficient manner. |
Additional Parameters
The drop-down Operation provides the possibility to select the import mode.
Read more about this topic in the official Pacemaker Community Edition (CE) usage .
The checkboxes for Archive Artefacts, Debug Mode, Single Transaction can be used to activate the
appropriate functionality.
To get more information about the feature behind these flags, you can also check out the official Pacemaker Community Edition (CE) usage .
The checkbox Cache Enabled enables the caching functionality.
In general, caching during the import is not very helpful, because the main impact on the performance will have the CRUD operations that can not be cached.
In case the import is processed over a network e.g., in the cloud, it can be helpful to lower the time necessary to load the data from the DB. Additionally, the cache warming functionality will only work if the cache will be enabled.
The drop-down Log Level defines the log level that has to be used.
By default this is set to warning, but can be changed to the given requirements.The log file named system.log will be
found in the directory with the import artifacts or archived artifact, if the appropriate checkbox has been set.